

Table of Contents
Have you ever felt a cold draft stealing your expensive indoor heat? It feels like your hard-earned money is literally flying out of the window. Insulating Your Home Yourself is a brilliant way to reclaim your financial comfort. You do not need a team of expensive contractors to see real results. A few rolls of insulating material can transform your living space instantly. Are you ready to stop overpaying for your monthly heating and cooling?
The secret to a cozy home lies in a solid thermal barrier. Many homeowners ignore their attics or crawl spaces for far too long. Home insulation acts as a protective shield against the harsh outdoor elements. You can achieve professional-grade efficiency with just a bit of weekend effort. This project is the ultimate gift to your future self and bank account. It is time to take control of your home’s energy consumption.
The Massive Financial Impact of DIY Insulation Projects
Saving money starts with cutting out the middleman and their high labor fees. Hiring a professional crew often doubles the total cost of your energy saving upgrades. By choosing DIY insulation, you only pay for the high-quality materials you actually use. You can research important legal requirements to ensure all your home projects stay fully compliant. Taking the lead on these tasks puts thousands of dollars back into your pocket.
Every square inch of thermal insulation you install reduces your reliance on expensive HVAC systems. Your furnace won’t have to struggle to maintain a steady, comfortable temperature. This direct reduction in wear and tear extends the life of your appliances. Most people recover their material costs within the first two years of installation. It is a rare investment that offers a guaranteed and immediate financial return. Focus on high-traffic leak areas to see the biggest impact on your bills.
| Cost Factor | Professional Quote | DIY Cost |
| Labor Fees | $1,200 – $3,000 | $0 |
| Material Cost | Retail + Markup | Retail Price |
| Safety Gear | Included | $50 – $80 |
| Total Savings | Minimal | Maximum |
Choosing the Best DIY Insulation Materials
Fiberglass batts are a classic choice for beginners because they are very easy to handle. Mineral wool offers superior fire resistance and excellent soundproofing for quieter rooms. Always check the R-value to ensure the material matches your local climate needs. Higher R-values provide much better resistance to heat flow in extreme weather. Proper selection ensures your energy saving efforts are actually effective and long-lasting.
Master Your Attic and Walls for Maximum Energy Saving
The attic is the primary escape route for rising heat during the winter. Attic insulation should be your top priority for any home efficiency project. You can even improve your home office space by stabilizing the temperature in your upstairs rooms. Adding a thick layer of cellulose or fiberglass prevents the « stack effect » from occurring. This simple fix keeps your toes warm and your energy bills low.
Wall cavities are another major source of hidden drafts and thermal bridges. While harder to access, wall insulation provides a vertical defense against the wind. You can use injection foam or rigid boards for unfinished garage walls. This layer of thermal insulation creates a much more consistent indoor environment. No more « hot spots » or « cold corners » in your favorite living areas. It is about creating a sanctuary that feels good in every season.
| Target Area | Best Material | Skill Level |
| Open Attic | Blown-in Cellulose | Intermediate |
| Interior Walls | Mineral Wool | Beginner |
| Basement Rim | Rigid Foam Board | Intermediate |
| Small Gaps | Expanding Spray Foam | Beginner |
Your Step by Step Guide to Insulating a Home Without a Contractor
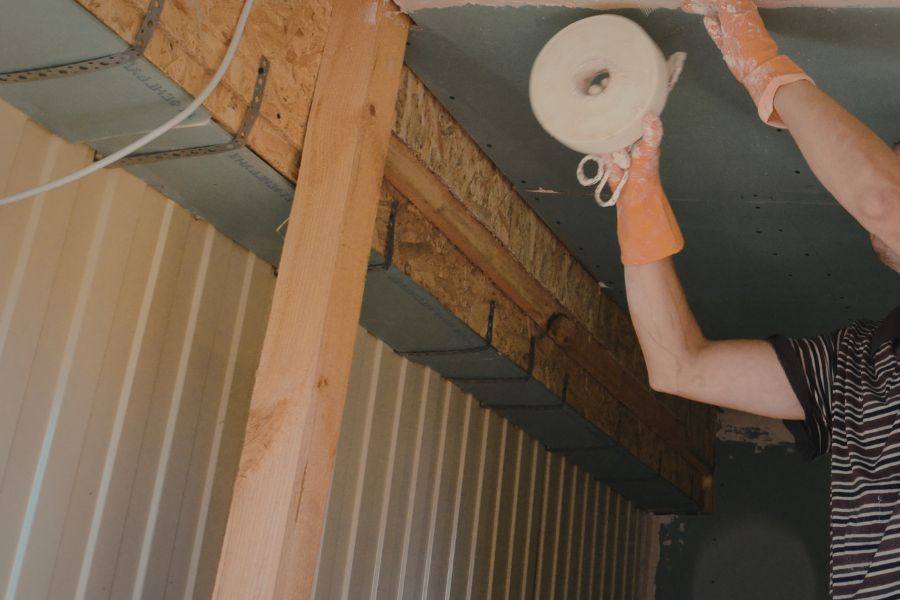
Start by sealing every small air leak with caulk or expanding foam. Wear a high-quality mask and gloves to protect yourself from irritating fibers. Measure your joist spacing accurately before buying your insulating material rolls. Lay the insulation snugly but do not compress it tightly. Compressed insulation loses its ability to trap air and heat effectively. Take your time to ensure there are no gaps between the pieces.
Frequently Asked Questions about Insulating Your Home Yourself
Taking on a DIY insulation task is an empowering move for any homeowner. You likely have a few questions about the best ways to start. I have compiled the most useful answers to help you succeed. These tips will ensure your home stays efficient for many years.
Which safety gear is absolutely mandatory for this job?
You must wear a N95 respirator to protect your lungs from dust. Goggles and long sleeves prevent skin irritation from fiberglass or mineral wool.
Can I put new insulation on top of the old layer?
Yes, as long as the old material is completely dry and mold-free. Adding a fresh layer is a great way to boost your R-value.
How do I know if my attic needs more material?
Look at the floor joists in your attic during the day. If you can see the wooden beams, you need more insulation.
Is it possible to use too much insulation in the roof?
The main risk is blocking your home’s vital soffit ventilation baffles. Always leave a gap for air to flow under the roof deck.